Friday, March 6, 2015

Quick Creations Fleur Anya

Good morning everyone. It's a sad day for me as this is my last post as a GDT for Quick Creations. Noelle, you are a doll to work with and I thank you from the bottom of my heart for giving me the opportunity to guest design for you.

So for my project today I created a card using an adorable stamp from the greeting farm called Fleur Anya. If your a greeting farm junkie like I am make sure you head on over to her shop as she has some of their stamps that have been hard for me to find.


For my card I used a card base of 5x5 then layered some maja design paper. I stamped the image on white card stock and colored her in with my copic markers and paper pieced her dress with the same paper collection. I added some pearls to the center of the flowers in her hair and used wink of Stella on the petals. I then added some lace and a flower from my stash. 

That is all for me today. Make sure you check out her store for all the wonderful new releases she is getting in as well as all the amazing product she already carries in her shop.

Products used from Quick Creations:
Wink of Stella - clear
The greeting farm- Fleur Anya
Glue dots

Friday, February 13, 2015

Quick Creations GDT Valentines card and gift tag

Good morning everyone. I hope you all have had a beautiful week. Today I am here to share with you a couple of things I created for Valentines Day for Quick Creations . 


To Create  this card, I started with a card base of 5.5" x 5.5". I layered and distress beautiful papers from the Bo Bunny Madeline Collection and added a bit of lace to the bottom of the top layer. I cut out a scalloped circle with my spellbinders die and adhered the beautiful Whimsy "Time for tea cocktail dress"  which I colored up with my copics and added a bit of wink of stella to her dress. I sprinkled on some heart glitter i had in my stash, added a couple of beautiful corner pieces to the top and finished it off with a few WOC roses and a resin bird that a friend created for me. 

I also made a quick little gift tag 

For this tag I used the Doohickey Vintage tag die,  more papers from the bo bunny madeline collection, some lace and bling from my stash, and a tiny sentiment stamp from CC Designs Amy R "Adoring you"  Stamp set. 

Thats all for me today. Thank you so much for stopping by. I hope you all have a wonderful weekend and make sure you head on over to Quick Creations to see all the wonderful new products in. 


Tuesday, January 20, 2015

Valentine's GDT card for Quick Creations

Good morning everyone. Today I am here to share with you a Valentine's card I created for quick creations. I started with a card base of 6x5, used bella rose paper, whimsy stamp called your love lifts me, colored with my copics, and stamped a sentiment stamp with Amy R adoring you stamp by CC designs. I also added a touch of wink of Stella to give her top some sparkle. To finish the card, I added a rosette, a pink rose from WOC and added a tiny resin bow in her hair. Make sure you stop by the store to see all the wonderful new products Noelle has in stock. http://quick-creations.myshopify.com 
Thank you for stopping by.


Tuesday, December 16, 2014

Quick Creations GDT Candy Cane Cherrie

Good morning all. I am back with my GDT project for Quick Creations. For my project I made a card using the adorable CC Designs Candy Cane Cherrie. Due to the fact that I will be mailing this card, I didn't want to make it too bulky to mail, but still love how adorable it turned out.

Products used:
Paper: nit wit digi paper
Stamp: Cc Designs Candy Cane Cherrie
Adhesive: Glue Dots
Punch: Martha Stewart border pinch and ek sucess photo corners
Die: Doohicky Tree

Thank you all for stopping by. Please head on over to Quick Creations and check out the wonderful craft supplies in her shop. Also make sure you follow the quick Creations FB Group to see all the new products that come in and the many discounts she post. 

Monday, December 15, 2014

Quick Creations holiday hop

Good morning all and welcome to Quick Creations holiday hop. 
If you have arrived here from Kimberlys blog you are in the right place. If not and you want to hop from the beginning, please head to the Quick Creations Blog


For my project I decided to make an ornament. I just love how this turned out. 

For my ornament I used an ornament that a dear friend gave me. It's one of those that come in two halves so you can add your goodies to them. 
I first started out by coloring up the greeting farm cheeky Xmas stamp with my copic markers. I also used a liquid appliqué pen to give texture to her hat, dress, and hand warmer. Before heating it with my embossing gun, I added some glitter to the top of the liquid appliqué, then fussy cut her out.
I then added some feather trim to the back and the bottom of the ornament, added some pink roses, some glitter confetti and adhered her to the center of the ornament. I sealed the 2 halves together with glossy accents and added flat back pearl trim around the seam of the 2 parts. 

For the back of the ornament:

I painted the back with white gesso then once dry went over it with a gesso and sand mixture to give it texture. I sealed the gesso and sand mixture with a coat of mod podge and added some glitter to give it the look of sparkle snow. Then to finish the ornament, I added a loop to hang the ornament from, a bow and a larger rose to the center. 

Quick Creations Products Used:
The Greeting Farm Cheeky Xmas
Mini hot glue gun

Your next stop on the hop is Olivia.
Thank you for stopping by.


Wednesday, December 10, 2014

Christmas Gift box for Quick Creations GDT

Good morning everyone. I hope you all are doing well. I know I have been MIA for a few weeks. We were having internet issues. But I am back!

Today I want to share with you a gift box I decorated for my GDT project for Quick Creations


Isnt it so cute???
 When the owner of Quick Creations sent me this stamp to work with, I knew right away I wanted to alter one of these treat boxes my dear friend Barb sent to me. I started by using a piece of paper from  an old christmas collection from Bo Bunny that I had in my stash. I traced around the front of the box on the back side of the paper, cut it out and used mod podge to adhere it. I stamped the CC Designs Robertos Sleigh ride stamp onto white cardstock and colored it in with my copic markers. After making sure the ink was completely dry, I fussy cut out the image and adhered it to the front of the box using Glue Dots adhesive. I then ripped apart a silk poinsettia flower, added pearl stamen to the center and adhered it to the top of my box using my mini glue gun. I just love the way it turned out.

Well thats all for me for today.
 If you havent stopped by Quick Creations shop, please check out the many wonderful products she carries in her shop. Also make sure you follow her facebook page as well so you dont miss all the sales and new products she gets in. 
I hope you all have a beautiful day.
Hugs!

Friday, November 21, 2014

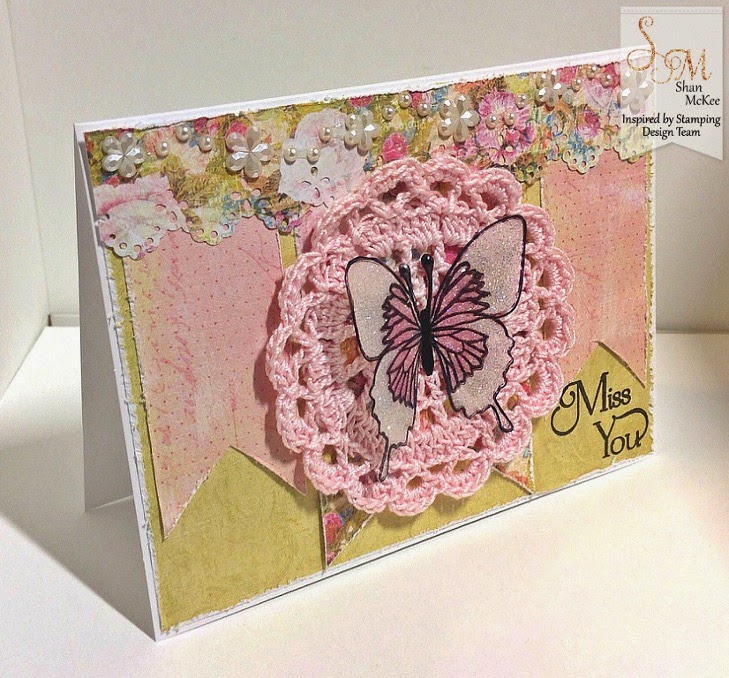
Butterfly miss you card.

Hi crafty friends. Its Shan here to share with you a card I created using a beautiful Butterfly stamp from the Australian Nature Stamp set and a Miss You sentiment from the Fancy Circles stamp set from Inspired by Stamping 

To make this card, I started by stamping the butterfly stamp onto a sheet of acetate with stazon black ink. Once the ink was completely dry, I cut out the butterfly then completely covered the entire butterfly in glossy accents and added diamond dust glitter and tapped off the excess glitter.  While that was drying, I started on my card.  

For the card, I started with a card base of 5" x 4.25". I layered on my papers using a sketch for inspiration. After all my papers where glued down, I stamped the "Miss You" sentiment stamp in the bottom right corner. I crocheted a little pink doily and adhered it to the center of the card then added some flower and flat back pearl trim to the top of the card. To complete the card, I added a pearl stamen that I had colored black with a copic marker, added  that to the back of the butterfly then adhered it to the center of the doily.  
Well that is all for me for today. I hope you all have a beautiful weekend.  
Hugs! 

Image
Image

Sunday, November 16, 2014

Inspired By Stamping Christmas Card

Good morning everyone. I hope you all are having a beautiful weekend. 
Today I want to share with you all a card I made using one of the sentiments from the holiday sentiments stamp set by Inpsired By Stamping.


To create this card, I started with a base of 5.5" by 5.5" and followed a sketch that I found on Pinterest. After layering all my papers, I stamped the beautiful holiday sentiment stamp onto a white banner with memento ink. I just love this stamp set. to finish off the card, I added a few white flat back crystals to the card.

Well that is all for me for today. Thank you for stopping by and I hope you all have a blessed Sunday. 

Stamp set used:


Thursday, November 13, 2014

Quick Creations GDT Kiki Latte

Good morning everyone. 
I hope you all are having a beautiful week so far. Today I have some exciting news to share with you all. I was asked to be a guest designer for Quick Creations! I am so excited to be able to work along side the owner (Noelle) and all her super talented designers for a couple of months. 
Here is what I created .....


I just love how this card turned out. Noelle sent me Kiki Latte to work with this month. Isnt she adorable? To Create this card, I started with a white card base 5.5" x 5.5". I layered on a few beautiful papers from Bo Bunny Isabella collections, added a beautiful pink ribbon across the center, adhered a couple of pink recollection bling swirls, and added a couple of Martha Stewart butterflies to the ribbon. I cut out a little doily and circle from the same paper collection and glued those together. 
For kiki latte, I stamped her onto white card stock and colored her in with copic markers. The shoes, outfit, and bow are all paper pieced. I know it isnt showing up well on the photo but her top, shoes, and hair band all have a little bit of shimmer which was added with wink of stella. After she was all paper pieced and colored in, I fussy cut her out and added her to the center of the doily. To finish off the card, I added an adorable little flat back flower to her hairband, and a few IAR flowers. 

Thank you for stopping by. I hope you all run over and check out her store.
Hope you all have a wonderful day!


Sunday, November 2, 2014

Inspired by Stamping Poinsettia Christmas card

Hi crafty friends. 
I am here today to quickly share with you a card I created using the beautiful Poinsettia Stamp set and sentiment  (Elegant Christmas Sentiment stamp set) from Inspired by stamping.  I have learned the hard way that mailing bulky cards doesn't work out too well as well as they cost a fortune when mailing out multiple cards. So this year I have decided to mail out flatter Christmas Cards. 


I really love how this turned out and will be alot easier having to make 30 of them. 
Thank you for stopping by and I hope you all have a wonderful day. 
Hugs!

Stamps used:


Friday, October 31, 2014

Pink and White Christmas

Hi crafty friends. I hope you all had a wonderful week. Today I want to share with you a pink and white Christmas card I made using 2 beautiful stamp sets from Inspired by Stamping


To create this card I started with a white card base measuring 4½" x 5".  I layered on pink card stock then added 2 beautiful digital papers.  I stamped  the Merry Christmas sentiment from the Elegant Christmas Sentiment stamp set then added a border to the center of the two papers along with a small pink satin ribbon. 


To create this beautiful Christmas stocking, I stamped the stocking using the Build a Stocking stamp set from this months release onto white card stock and fussy cut it out. I stamped the stocking once more on pink card stock and used a circle punch to cut out the heel and toe part of the stocking. I also cut a bit from the top of the pink stocking to add to the top of the white. Once I had all the parts cut out, I adhered them down minus the top pink part) and ran them all through the sizzix using a snowflake embossing folder. I know it didn't show up in the photo, but all the raised embossed parts have an iridescent glitter on it. I added some tiny pink lace to and popped up the top pink piece on some foam dots. I then added pearl trim above the lace, around the heel, and the toe part of the stocking. To finish this off, I created a little loop where a stocking would usually be hung from, added a tiny bow, a rose to the center of the bow, and then adhered that down to the card. 

Well that is all for me today. Thank you so much for stopping by.
 I hope you all have a wonderful weekend. 
Hugs!

Stamps used:


would like to enter this card into the following challenges:

In the pink:  Luscious Lace
Divas by design: anything goes
Fab 'n' funky : Christmas 
Miriams Crafting Blog: Shades of pink 
The paper Shelter: is it too early for Christmas?
Simon says Stamp: Anything goes
Winter wonderland: Pick & Mix


Tuesday, October 28, 2014

Ginger Blessings

Hi crafty friends! I'm here today to  share with you a card and a tiny gift box I created for my sons teacher for Christmas using two of the beautiful stamp sets from last weeks release over at Inspired by Stamping. I absolutely love ginger bread men as they are one of my favorite treats!


To create this card, I layered my papers onto my card base and stamped/embossed the ginger blessings sentiment from the sugar and spice stamp set. I adhered some burlap trim, crochet trim, and some pearl trim across the center of the card before layering on a few die cut ovals and added my little gingerbread girl using the same sugar and spice stamp set. For the finishing touches I added tiny pearls to the center of her star button and a pearl bow to her head. I love how this card turned out. Its so country chic.


I had plans to give his teacher some chocolates for Christmas but my son informed me that his teacher has an allergy to chocolate. When I ran across this yummy smelling hand sanitizer, I felt this would be a perfect gift for a teacher who deals with a lot of sick children through the year. So instead of just popping this into a gift bag, I created this adorable tiny box. The box measures, 3¼" x 1½" x 1⅛". Once I cut out the box, I added some pattern paper that matched the card, cut out a little window using a tiny oval die and backed it with a piece of acetate. To decorate this box, I got out the beautiful Christmas Wreath stamp set. I embossed the bow in white onto my pattern paper, fussy cut it out, added a pearl to the center, and adhered it to the top of the box leaving enough room so the box can still close. I then clear embossed the holly leaves onto a green cardstock, fussy cut it out, added some silver stickles, then adhered it to the bottom corner of the box along with some white pearls for the berries.


My son is so excited to be able to give this to his teacher. 
Now I just have to make him understand that he has to wait to give this to her. lol.
Well that is all for me today. I hope you all have a wonderful day.

Products used:


Challenges I am entering :
Simon says stamp Wednesday Challenge: Get crafty and use Kraft
Crafty card Makers: Cut it out
613 Avenue Create: anything goes with boxes, tags, more
Amusing Challenge: Anything goes
Penny Black: get ahead for christmas
Polkadoodle: Christmas Fun


Sunday, October 26, 2014

Inspired by Stamping birthday blog hop

Surprise!  I'm here today, along with other gals on the Inspired By Stamping design team, to wish the Inspired By Stamping store's owner, Joanna, a happy 3rd anniversary for the store and an early happy birthday!  You should have arrived her from Nurpur Priya blog.  If not, and you'd like to join in the fun, please start at Joanna's blog and hop along with us to wish her many happy returns!  We've all made birthday creations to share using inspired By Stamping products.  Come and take a peek at mine!


Joanna I hope you have an amazing birthday filled with lots of love, laughter, and many blessings!

Thank you for stopping by today and for hopping with all of us from Inspired By Stamping!  Your next stop is Vicki Dutcher  blog.  

Stamps used:


Saturday, October 25, 2014

gift box card and candle stamping tutorial

Good morning crafty friends!
Today I am here to share with you a card I made along with a tutorial. 
This is my first written tutorial so if you have any questions, please don't hesitate to ask.
Below is the card we will be making.

The outside of the card was embellished with pattern paper, a spellbinders die, a recollections flower, a bow from a small tiny piece of ribbon I had left over in my stash, a couple of snowflakes I punched out and the sentiment is from the Christmas greetings stamp set from Inspired by Stamping. I think this card turned out beautiful.

below is a view of the inside.

The inside of the box stores tea light candles that I stamped with an adorable snow flake stamp from the build a stocking stamp set from Inspired by stamping. This box does not have to hold candles. You could add candy, a gift card, crafty embellishments, etc. 

Are you ready to get started?
What you will need to create the gift box card:
paper trimmer
acetate for the window of the box
1 12"x12" sheet of card stock
glue or score tape
scoring tool of your choice.

Part one

First your going to want to take your 12 x 12 sheet of paper and cut it down to 4⅞" x 11¾".
Make sure you put aside the other part of the 12 x 12 sheet as we will be using this in step two.
On the long side of the paper, you will score @ 3⅜", 4⅛", 7½", and 8¼".
Rotate your paper left and score @ ¾", 4⅛"


Cut lines as directed. You will cut on the score line only where the arrows are directing you to cut. make sure you do not cross a score line unless stated. 

Now you should have something that looks like this:

At this point if you want to use your die or punch, now is the easiest time to do so. 


Once your window is cut out, fold all your score lines. If you plan on adding any pattern paper to your box or acetate to your window , now is a good time to do so. It is alot easier to add while this is still flat.


If using tape, now would be a good time to add that. 


once all your papers, acetate, and tape are on, you can construct the box card. 


Part 2

With the paper you set aside in step one, cut this down to 5¾" x 5¾".
Score this at ⅝", 1¼", 4½", 5⅛".
Then turn your paper to the left again and score at the same measurements.


Note: the arrows in the center of the diagram are not cut lines. I added them to show that you score same measurements for both directions. Only cut where it says remove or where the arrow next to the word cut is. 

After you cut you are done scoring and cutting your lines this is what you should be left with. 


Fold along your score lines and add your paper and tape.
When building the box, make sure you have the tabs ( the areas in pink) taped down before taping or gluing down the top flap so that it looks cleaner on the inside.
The photos below, show where I layered my papers and tape.


Now your box is complete! I hope I have explained everything clearly for you. Again, please do not hesitate to ask if you have any questions or problems.

Next up is a short tutorial on how I did the stamping on the tea lights.

Things you need:
Tissue paper
a  piece of card stock
hole punch or crop a dile
stamps of your choice
and heat tool ( im sure you can use a blow dryer on a low speed but havent tried it)

First you want to take your tissue paper (I used 4 small squares), and layer them on top of your cardstock. If punching this makes it alot easier to cut through the tissue paper. Run your cardstock/tissue paper layer through your die cut machine. 


Please dont mind my messy cutting plates. They are well used. lol.
Once your tissue paper is cut out, punch a hole in the center of the tissue paper big enough for your wick to fit through. Now stamp the image you want in the center of the tissue. For mine, I stamped with Chalk ink. It seemed to hold up well. 


Next you will lay your tissue paper on top of your tea light. I press and smooth out the tissue paper as much as I to help it not blow up while heating. 


I used a pair of crafting tweezers to help hold the tissue paper while heating.
Note: try not to hold your heat tool to closely during this process or you will end up with lumps from the wax  moving around. 


Thats all there is to it!
I hope you enjoyed todays tutorial.
Thank you so much for stopping by and I hope you all have a wonderful weekend.

Stamps I used:


Challenges I am entering this project into:

Anything goes with a twist: a touch of pink
Polka doodles: Christmas fun