Sunday, August 10, 2014

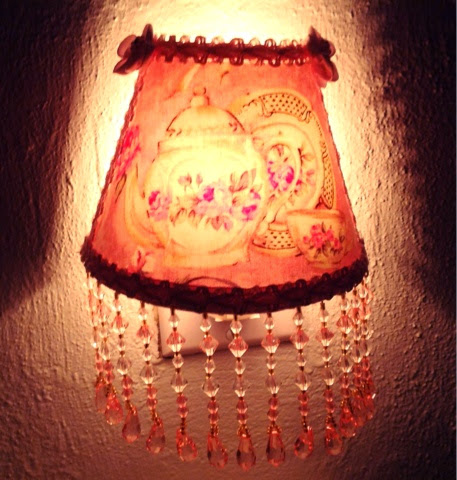
Beautiful altered night light

Good afternoon all. This is going to be a quick post to share with you a beautiful little night light I created. I just love how this turned out.

I had ordered this little night light from amazon last week and it arrived within a couple of days. I altered it with this really beautiful tea set and roses fabric, added the gorgeous beaded trim to the bottom, trimmed it with a little pink trim and added a couple of satin flowers to the top corners.  It is so beautiful at night as well don't you think? 
Well thank you for stopping by and I hope you have an amazing week.
🎀hugs🎀


Shabby chic dream catcher (3rd post for the day)

Hello again! I am back to share with you my 3rd post for the day. Trying to catch up on the few items I did over the summer. So for this post I wanted to share with you a shabby chic dream catcher I created for a swap with a dear friend of mine. I originally wanted to use a doily for the center as I had done before but couldn't find any at the time that would fit the small metal ring I used and didn't have enough thread to crochet my own. But that's ok. I still love how it turned out!!!
I first started with a metal ring I had purchased at michaels. Then I wrapped the ring in cotton batting. Once that was covered, I then tore strips of fabric to cover the batting. For the center, I used crochet thread and added a couple of crystal beads. I also created a handmade lace butterfly from some lace I purchased at walmart to the center of the dream catcher. On the bottom, I tied lots of beautiful laces, fibers, and seam binding as well as some beautiful beads and feathers. I then finished off the dream catcher by adding a couple of pink flowers/ leaves that I had purchased on a zibbet store as well as a beautiful white flower gifted to me by my dear sweet friend Lydia. I just love making these and love how beautiful this turned out. Please let me know if you have any questions. 
Thank you for stopping by and I hope you have a beautiful day.
🎀hugs🎀

A beautiful tag ( my second post for the day)


Hello again. I wanted to just quickly share with you a tag I made for a friend. I just love how this turned out.
Paper: Bo Bunny Isabella Collection
Die cut sentiment: same bo bunny collection
Large pink butterfly: prima
Flatback pearls: Natasha's scrapbook korner
Tiny butterflies: Martha Stewart butterfly punch
Doily: gifted to me from my friend Toni
Laces: from my stash and hand dyed by me
Metal corners: purchased from michaels and I heat embossed them white
Pearl sprays: made myself following nurse Tara tutorial
Flower: WOC rose gifted to me by my friend Ana

If you have any questions please let me know. Thank you for stopping by and I hope you have a beautiful day.
🎀hugs🎀

I'm back and I have a few projects to share.

Good morning everyone. I hope you all are having a wonderful weekend. I know I have been gone awhile. With summer here, I have been trying to spend as much time with my husband and son as possible so I had not been crafting much outside of swaps and RAKs that I had worked on. I can not believe how fast this year has gone by. In less than two weeks my son will be starting jr high. He is so nervous to be starting a new school with new teachers, but it know he will do great!

So today I wanted to share with you a couple of items that I created for a dear friend as well as a swap we had done. I just love how everything turned out. 
Starting with the swap, we decided to swap altered spoons and I just love how these turned out. I would love to find some baby spoons and make some ornaments for a shabby chic christmas tree. Wouldn't that be cute!
So for these spoons, I used a couple of beautiful laces from my stash, some rosette trim, flat back pearls, WOC flowers, seam binding, and some lace butterflies. For the pink spoon, I hand dyed the laces used on that spoon. 

The next items I worked on are items I made for her just because. She really loved my altered cassette stick pin case so I wanted to make her one along with a few matching embellishments. 
Starting with the upper left corner... I altered a binder clip using this beautiful paper from Maja designs, added a tiny heart lace to the top, a crochet heart yo the corner as well as a few little beautiful WOC roses, and some pearl stamens. I crocheted around the entire clip on both sides and added another little lace butterfly. The note card is a prima note card that I backed with white cardstock and pinched around with a Martha Stewart punch. To the right of that is the altered stick pin cassette case I made for her. For this I used the same Maja Design paper, a couple of metal corner embellishments that I heat embossed white, a spell binders die cut, and a prima cherub. The laces used on this were laces in my stash. The bottom left corner I created a bottle cap charm using an adorable image from etsy. Then created a bunch of pearl dangles and a little angel for the bottom. I also added a tiny pearl heart on the side of the bottle cap with a teeny tiny pink resin rose. For the bottom right photo, I painted a couple of wooden clothes pins, then added more of the same Maja Design paper, had hubby drill a tiny hole in both and created small dangles for them. In the center of the clothes pins, I added a couple of pieces of lace that I had cut up and added more pearls, and WOC flowers and some pearl stamens to those as well. I just love how these all turned out and I can not wait for her to receive them. 

The last item I made was a tiny little cereal box to hold all the items in the above picture. I made this box following Bonas tutorial on YT. It's rather plain but still love how it turned out.

Anyway that is all for now. I thank you for stopping by and I hope you all have a beautifully blessed weekend. 
🎀Hugs🎀


Monday, May 19, 2014

Altered cassette case stick pin holder

Good afternoon everyone. I hope you all had a beautiful weekend. I wanted to stop by today to share a project that I finished last night. After watching YT months ago I wanted to make a cassette case stick pin holder. My dear friend barb had sent me some a while back and so I decided to give it ago. 


was completely nervous when working on this as I had not ever made stick pins before and I have to tell you I LOVE the way the stick pins and the altered cassette case turned out. I made this for a sweet friend of mine in Australia. Isn't it beautiful??? 

Well thank you so much for stopping by. If you are interested in seeing more details or hear the products used, please head on over to my YT channel:  https://www.youtube.com/shabbylilangel
Hope you all have a blessed day.
Hugs, 
Shan

Wednesday, May 14, 2014

Handmade burlap bag

     Good afternoon everyone. I hope you are all doing well and that you all had a wonderful Mother's Day. I spent a quiet day at home with my son and my husband although toward the afternoon I sent him out to go fishing. Lol. Although he didn't catch anything that day, he did have a fishing partner. It was a snake that was sunbathing really close to him. Needless to say, it wasn't his most favorite fishing partner.

     So the last couple of days I have been wanting to try making a burlap bag for a friend. This was a real challenge for me as I am thinking I am lace challenged. I watch so many talented ladies use tons of different lace on their projects and make it look so easy. Well this was far from easy for me, but I made it work and I am happy with how it turned out. 

I think it turned out pretty good for being my first one. I hope my friend like it. I plan on filling it with lots of goodies for her. Anyways, thanks for stopping by and I hope you all have a beautifully blessed week. 
Hugs


Wednesday, May 7, 2014

Shabby chic lace butterflies

Good afternoon all. I am back with my fourth and final post of the day to share with you some lace butterflies I created. I just think these are so beautiful and look great on cards and other projects. For these butterflies, I used some lace I picked up from walmart and cut out 2 pieces for the wings. I attached a pearl stamen to the center for the antennas and finished it off with a little doodad flower and some beautiful AB flatback crystals. With the let over pieces from the cut up lace I created a tiny flower and added the same flower and crystals to it. I have made 3 sets of these to give as gifts.

Thank you for stopping by and I hope you have a beautiful week. 
Hugs,
Shan


Shabby chic ornate plate charm

Good afternoon all. I am back with my 3rd post of the day to share with you a shabby chic ornate plate charm.  This is the first time I have attempted on making a charm and I just love how this turned out.

For this charm I followed a tutorial on YouTube that Liz Russell made. I started with a Tim holtz ornate plate and gesso and painted the plate. Added a image from a prima note card to the back and applied glossy accents to the top of the image. I created a few dangles out of some pearls and beads I had in my stash. On the side of the ornate plated I added a few I am roses flowers, a feather and a lace butterfly appliqué. I then attached it to a tag and added some lace and pearls to the bottom of the tag. Thank you for stopping by. I hope you have an amazing day.
Hugs,
Shan


Shabby chic wall hanging

Good afternoon everyone. I hope you all are having a beautiful weekend. I wanted to stop by and share  with you a wall hanging I made for a friend. I really hope she loves it.
For the base of this wall hanging I used a heart chipboard page from a michaels mini album. To see how I created this piece please visit my YouTube channel. Thank you for stopping by and I hope you all have a blessed day. 
Hugs
Shan

Birthday challenge giveaway

Good morning all. I know it has been awhile since my last post. We have had so much going on around here, from painting the house, to raising and bottle feeding 2 new baby goats, family members in and out of surgery, my sister having a new baby, and of course with my health still being bad, I have had ups and downs with that as well. But I am trying to organize my craft space and get back to crafting. I will have a couple of projects to share with you all soon. But I did want you all to know, my birthday is this month so I am having a birthday challenge giveaway. If you are interested in playing along, visit my YouTube channel @ www.youtube.com/shabbylilangel . Hope you can play along and have a beautiful week. 

Thursday, January 30, 2014

My entry into Sabrina Ann's YT sexy man valentine challenge

Good morning everyone. I hope you all are doing well and for those of you that have been hit by the winter storms, I hope you all are staying safe and warm. Today I want to share with you my entry into Sabrina's sexy man valentine challenge. This challenge was really a challenge for me as I created a tag for my entry and tags are a little out of my comfort zone. The rules for the challenge are to create a card or tag. Must use the color pink and or red. Must list 3 things that you admire about that person, and to use a heart. Here is the link to her video if you would like to play along. http://youtu.be/l-LQfYXrG_Q . You can play along even if you don't do videos and you have until Feb 3 to submit your entry. Her video has all the details there as well.
So here is the tag I created.
I just love how this tag turned out. For my sexy man, I decided to make a tag using an image of Paul Walker. So for the 3 things I admire him for was he was a generous person, a very talented actor, and I could admire his looks all day long. Lol. The base of this tag was created using chipboard. The pattern paper I used is from wild rose studio "letters from Paris" collection. Gorgeous papers. The lace is and foam heart are from www.zibbet.com/divinelaces. The pearl trim was a gift from my friend barb. The pearl flourishes are from recollections. The two roses are from mb treasurista store. The heart chipboard is a maya road hear that I painted pink and then added glitter to and I crocheted the three hearts in the top right corner. I think I have covered everything. This tag is up on my YT channel if I have left anything out. Thank you for stopping by and I hope you have a beautiful day. 
Hugs, 
Shan

Monday, December 30, 2013

B&W mini album, altered candle stick, and altered binder clip photo holder


Good morning again. So I guess I lied when I said in the last post that it was all for me today. I realized that these projects never got posted either. So I want to quickly share with you a mini album, a altered candle light, and a binder clip photo holder I made for my cousin. If you have any questions, just leave me a comment below. I also have a video on my YT channel that shows more details. You will find my YT channel on the right sidebar of this blog. Thank you all for stopping by.


Altered dollar store ornaments


For Good morning all. I know it's been awhile since my last post. Problem is, my laptop has been so slow and I am always on my iPad. I have tried uploading photos from my iPad before with no luck. So here I am at 2:55 am and I can't sleep so I decided to look thru the App Store to see if there was any apps that would help me post directly from iPad. If this post does post, you know it was a success. Lol

So enough of my ranting. I hope you all had a wonderful christmas. We live over 2000 miles from our family so it was a very quiet christmas as home. Below are some altered dollar store ornaments I created this year. I was hoping for an all pink and white tree, but that didn't happen this year. Oh well. There is always next year. 

This ornament was originally a hot pink glittered ornament. I took some acetone and pour a bit into a coffee can and let it sit in there for about 10 seconds and used an old wash rag to wipe away the glitter and repeated this process a couple of times. Super easy. Then I used gesso to cover the snowflake in white and added some crystal stickles once it was dried. I then hot glued some Venice lace trim around the center that I had dyed pink and added a shabby chic rosette on top of the trim. I then glued a clay flower to the center of the rosette and added some pink gems along the outside of the snowflake. Easy breezy and I think it turned out beautifully.
For this reindeer I did the same process as above and used 2 venise trims to his neck along with a little snip of a feather, some pearl stamen, and some beautiful paper roses. Then finished it off by adding a tiny pink gem to his nose. 

Well that's all from me for now. I hope you all have an amazing new year filled with many beautiful blessings. Thank you for stopping by and for your support. It means the world to me. 
Hugs, 
Shan


Saturday, November 9, 2013

Lots of Beautiful Projects

Good morning everyone.
 I hope you all are having a beautiful weekend. It is really REALLY cold here this morning. It is now 27 degrees and they are possibly calling for snow on Tuesday night into Wednesday morning. I don't know that I am going to hold my breath for that one yet. The weather forecast here seems to change hourly. 

 I know that I have been slacking on my blog lately. I really wish I could post from my Ipad as my laptop seems to always go so slow, so needless to say I am not on it much. I wanted to share with you all some wonderful projects I have been working on over the last week. A good friend and I decided to make a few ornaments for eachother for Christmas and I have also altered a little something extra.

For the first ornament, I altered a key from Michaels. 


This key was originally white with a bit of brushed gold over it and I wasnt really liking the look of it so I started by heating the key up with my heat gun and dumped a bit of white embossing powder over it, then reheated. Unfortunately it wasnt covering too well so while it was still hot, I rolled it into some UTEE. It gave kinda a beaded effect that I really like so while the UTEE was still hot, I poured a bunch of white glitter on it and I really like the texture it gave to the key. Next I took a piece of tulle and tied it into a bow and glued it to the key. Then I added a little strand of pearls and added a feather over it. I had ordered this beautiful little cherub from a etsy store and was hoarding it but knew it would be the perfect fit for this key. So I glittered up her little wings and used a really light pink copic marker to give her rosey cheeks and lips. The little rose is from I am roses and i glued that down and added a bit of glitter to that as well. I finished it off by adding a bit of seambinding to the key along with a sparkle bead to hang the key from. 

Next up is an altered matchbox I created. 

Now this is the first time I have altered a matchbox and this was a real challenge for me. I am not sure if I really liked the way that this came out.  I first started by painting the match box with some gesso then I added some vintage paper ( it was from a 1895 German paper i purchased on eBay some time ago) and I used mod podge to glue that down. I then took some crocheted lace and adhered that on top of the vintage paper. I trimed the edges of the box with some flat back pearls that I had purchased from Sa Crafters and then created a little tiny rosette out of some small doilies. I created a little angel pearl dangle for the bottom of the box and used some pearls and wire for it to hang from.

Now this 3rd ornament I really love. 

Well actually one of these are for her and the other I am keeping for myself. I first created the larger heart as a trial heart. I have had a small piece of this adorable fabric in my stash for 5 years not exactly sure what I wanted to use it for. But when I thought about trying this, I knew it was the perfect fabric for it. I do have a video up of the larger heart if you wish to see it in further detail here.

Last but not least, I altered a little battery operated light for her.

This is another project that I absolutely love. Again, if you would like to hear how this is created I have a video explaining all the details here.

Thank you for stopping by and I hope you have a wonderful weekend.
Hugs and Blessings to you all. 
Shan


Saturday, September 21, 2013

Inspired By Stamping Inspiration Challenge #65

Good morning everyone. 
Today I wanted to share with you a card I made for another Inspired by Stamping Inspiration Challege. I just love the colors in this challenge and i think the papers work nicely. If you chose to play along, you still have until the 24th of September to get your entries in and dont worry, if you do not own any of their amazing stamps, you can still play along. 
Here is the inspiration photo:

And here is the card I made for the challenge:
 Isnt it just darling?
My friends birthday is coming up on the 29th so I wanted to make her a special little card. I hope she likes it. This card measures 5½ x 5½ in. I started with a textured tan card stock and layered these beautiful papers from Authentique "Cherish" collection. I added a doily that I had painted with a light pearl green watercolor to and cut out a heart shape from the tan card stock. I ran the heart cut out thru my sizzix with a cuttlebug embossing folder then layered it on top of the doily. This adorable stamp is from The Greeting Farm and it is a set called "Lovey Dovey". I paper pieced her clothes and the little heart in her hair from the same pattern paper used in the card. The beautiful Birthday Sentiment is from Inspired By Stamping called "Big Wishes". 
I crocheted a little 5 petal flower and added a little flat back pearl to the center. I am really happy with the way this card turned out. 
Remember, Inspired by stamping is having a blog hop right now and will run for 2 weeks. If you would like to hop along with them, you can join them here.

Thank you for stopping by and I hope you all are enjoying  your weekend.
Hugs and Blessings,
Shan


Friday, September 20, 2013

Inspired By Stamping Inspiration Challenge #66

Good morning everyone. 
I dont know about you, but I am so happy it is Friday! Don't get me wrong, I don't live a busy life style as I am a stay at home mom but the weekends give me an opportunity to sleep in! Sad part about it is, I am so used to waking up at 5 am every morning that when the weekend comes around, my body says " hey lady, time to get up." lol

So today I want to share with you a card I made for a challenge over at Inspired By Stamping. 
Now I have to say this was REALLY a challenge for me as I don't usually work with these colors and was real limited on what I had. But I think I made it work and I am really happy with the way that it turned out. If you want to play along, you have until the 24th of Sept to get your entries in. You do not need to use one of their products at this time and there are 2 other color challenges going on as well. Also make sure you head on over to the blog as they have a blog hop going on today and will run for 2 weeks. 

Here is the challenge I entered. 

And this is my card:

I cant believe I didn't use any lace or flowers on this! I think it still turned out adorable. 
For this card I layered black and yellow card-stock. I did have one sheet of yellow and white gingham pattern paper that I have had in my stash for a gazillion years. lol OK not really that long but I would have to say for at least 7 years. EEK. I used a Martha Stewart border punch as well as an ek success photo corner punch. I used a scalloped circle and layered it with a white circle that had score tape  on it and added white fine glitter to. Then i took a bee sticker and layered it on top of the white glitter and used yellow fine glitter to the body as well as silver fine glitter to the wings. The beautiful Sentiment stamp is from Inspired by Stamping "Big Notes" set.

Thank you for stopping by and I hope you all have a wonderful weekend. 
Hugs and Blessings,
Shan


Wednesday, September 18, 2013

Card for a friend

Good evening everyone.
 I hope you all are having a beautiful week. I have had a cold for the last 2 weeks and this darn cough just wont seem to go away. I have been bored out of my mind being in bed so much so I decided to make a card for a dear friend of mine. I just love how it turned out. 


Isn't it beautiful?
 This card measures 5½  x 5½.
First I started with some pink card-stock. I then layered it with the beautiful pattern paper from the Bo Bunny Isabelle Collection. I glued a doily to the center that I had picked up from Michaels in the baking department. I added a die-cut from the paper collection and used pop dots to  give it some dimension. The image is from the Greeting farm and she is Dressy Ebony. I colored her with copic markers and paper pieced her dress from the same collection of papers. I think her little outfit is adorable. I also used pop dots behind her to pop her up. The pink Rosette I have had in my stash for a couple years now. I'm sorry, I do not remember what store I purchased it from. I cut apart some Venise Lace I had and tucked it under the rosette. They look a bit like little leaves. I also tucked in a few strands of pearls that I had picked up from AC Moore and then added a beautiful clay rose to the center of the rosette. The filigree corners I got from ButterBee Scraps. They were a copper color so I heated them up with my heat tool and poured on white embossing powder. The butterfly's were punched with the Martha Stewart 3 in 1 butterfly punch and I finished the card off with a beautiful sentiment stamp by Inspired By Stamping  . If you haven't been to their store, Make sure you check it out. They have some AMAZING stamps that are perfect for all occasions.
Thank you for stopping by and I hope you all have a wonderful week. 
Hugs and Blessings,
Shan

Thursday, September 5, 2013

Pumpkin Marci Halloween Card

Good morning everyone. 
Yesterday everyone in the house woke up with a sore throat and I also have a cough. Ugh I hate being sick. So to pass my boredom yesterday I went into the craft room and created my very first criss cross card. I just love how it turned out. 
I used the adorable Pumpkin Marci Digi from La-La Land crafts. When I saw her in the shop I knew I had to get her to make my mom a halloween card as when I was a little girl she made me a pumpkin costume almost identical to Marcis. I used basic black cardstock from Michaels which measure 5.5in x 5.5 in. The pattern paper is from K & Company. The web border punch is by Martha Stewart and the doily is from the baking department at Michaels. I used a Lindy Stamp gang spray to color the doily. The webbed trim I picked up on ebay a few years ago and wish that I had it in more colors. Love it! The bling on the doily was some that I had in my stash. 

Below is a start to finish video on how I created this card. 


Thank you for stopping by and I hope you all have a beautiful week. 
Hugs and Blessings,
Shan

Saturday, August 24, 2013

Amazing Canvas Kits For Sale

Good morning all. 
Not here to share anything I made today but to spread the word about some beautiful Canvas kits that are for sale over at http://www.zibbet.com/craftytexaswoman . She has other great items in her shop as well. I hope you all stop by her zibbet shop and take a look. 

Here are 4 of the kits she has up for sale. 


I dont know about you, but I am certainly drooling. So hurry over and check out her store.
I hope you all have a beautifully blessed week. 
Hugs, 
Shan   

Sunday, August 11, 2013

Cards

Good evening everyone. Tonight I wanted to share with you a few cards I have made in the last couple of weeks. I know I am late posting these but I can not post from my ipad and this laptop is really REALLY slow. So I am not on it much. 

Also I wanted to let you all know that I am trying my hand at card sketches. If you are interested in checking them out you can find them at SketchesByShan.Blogspot.Com . Would love to hear what you think of if you use one would love to see what you created with it. 

Now on to my cards..
First up is a card that I made for a friend using a digi stamp by Sherri Baldy.
I think these images are so adorable. 

Paper: Trimcraft Premium paper pad 6x6 called Spring Feast
Card stock: Craft paper
Image: Digital stamp by Sherri Baldy on etsy
Clock die cut: sent to me from a friend
Butterfly: Martha Stewart punch
Burlap Trim: Ordered off a zibbet store
Flower: Recollections white flower 
Flower sprayed with Shimmerz
Pearl: Recollections
Coloring: Copic Markers

The second card I made was inspired by a all white card on Pinterest. 
I made this card for a friend of mine as a get well card as she had surgery.

Cardstock: White from Michaels
Embossing folder: Cuddlebug
Punches: Scalloped, Circle, and a Martha Stewart Butterfly Punch
Trim: was sent in a RAK by Lineca
Pearl hearts: ordered from Ebay

My 3rd card is a Black and white just because card that I made for my mom. This card was also inspired from a card on Pinterest. 

Cardstock: in Black and White from Michaels
Punches: Lace border punch and butterfly punch both from Martha Stewart. 
Lace and trim: Trim From Hobby Lobby and Lace from my stash
Scalloped squares: Storybook Cricut Cart
Flowers: I am roses petals I took apart from rose
Stamp: Won in a contest several years ago but have no clue who the maker is.
Pearl: Recollections

My last card was a card I created for my BFF in California.
Paper: Prima
DieCut: Storybook Cricut Cart
Punch: Martha Stewart border punch
Image: Saturated Canary
Rosette: Tim Holtz trim
Pearls: Recollections
Metal Filagree Corner: Purchased from Butter Bee Scraps on Zibbet
Coloring: With my Copic Markers
Heart Gems: Ebay

Thank you so much for stopping by.
I hope you all had a fantastic weekend.
♥Big Hugs & Many Blessings♥
Shan