Wednesday, July 24, 2013

6x6 Layout

Good afternoon everyone. 
I wanted to quickly stop by and share with you a layout I created today. It has been a little over 4 years since I last worked on a scrapbook page and I have to say that I was a little worried about how it would turn out. My friend Barb introduced me to a wonderful site http://creatingthecraftylife.com/ .They have a sketch challenge right now that really inspired me to make a page. If you havent visited the site, you might want to check it out. They have wonderful challenges, swaps, classes, and lots of inspiration. 

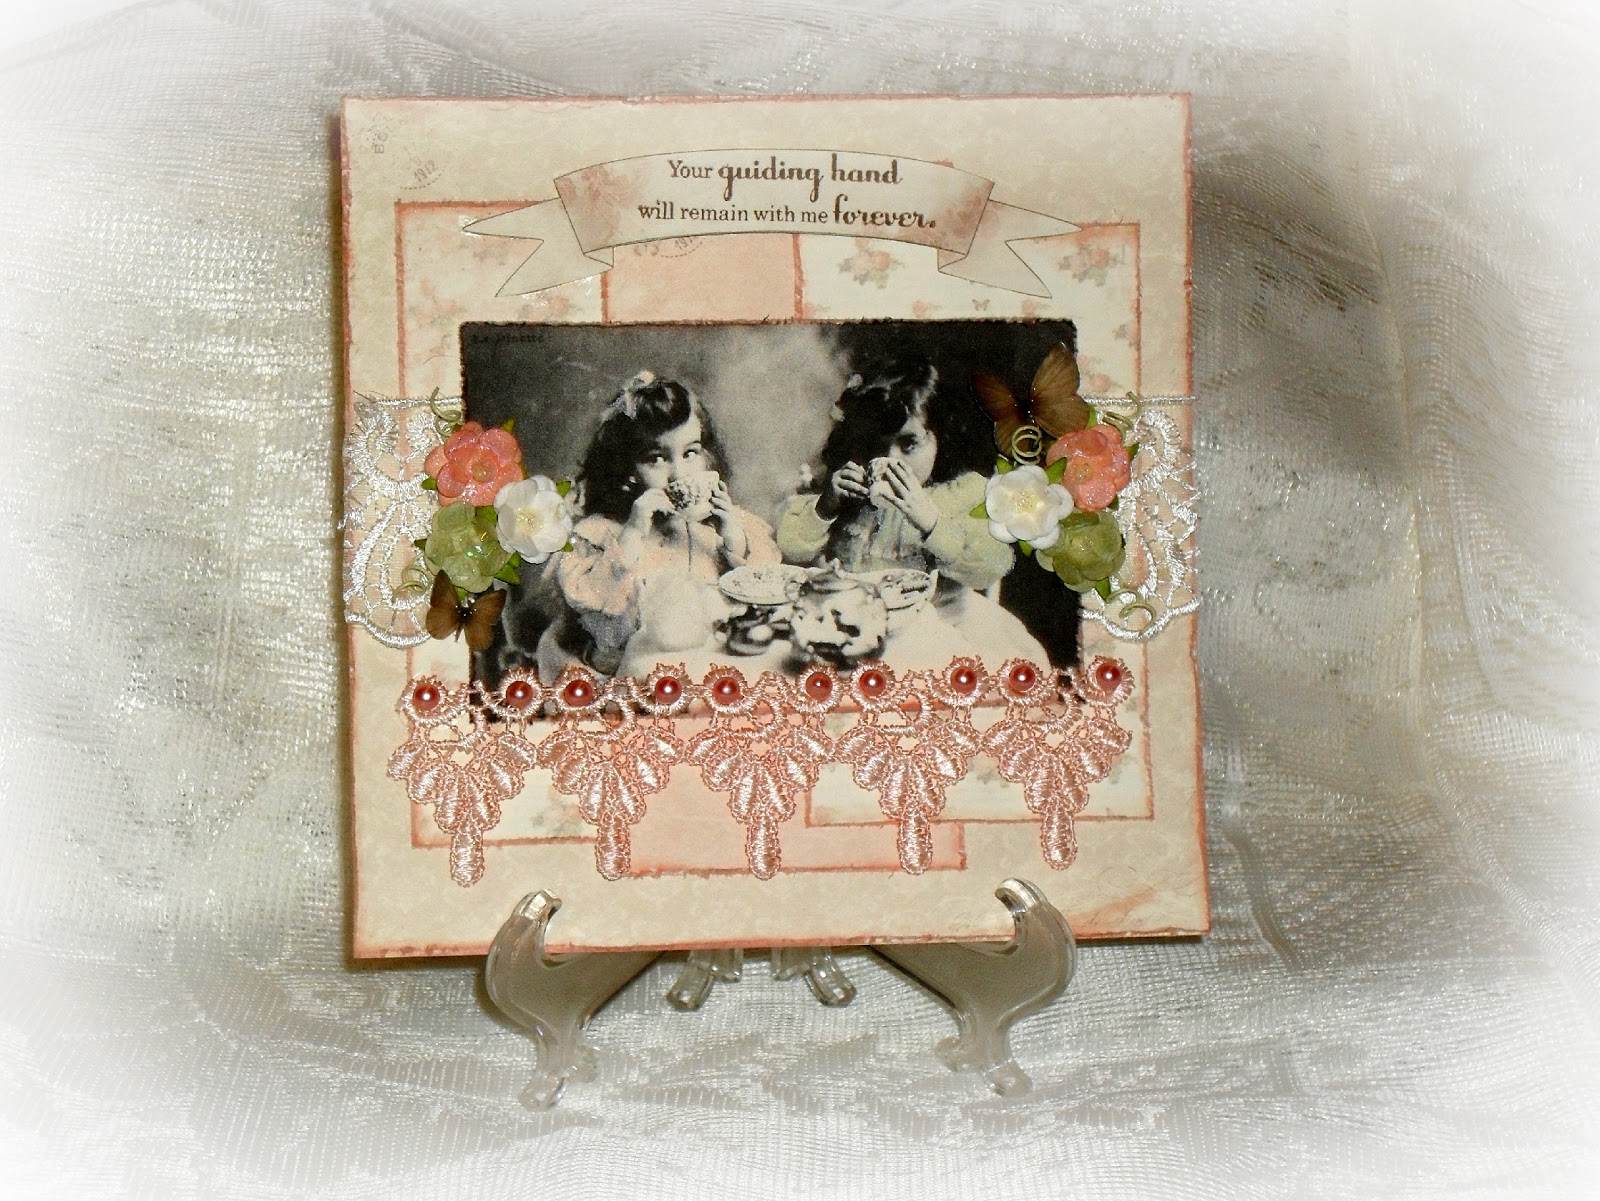
Here is the page I created:

For those of you that have been following me know that I am totally in love with Pion Design paper. It is my absolute favorite. Isnt it just gorgeous? So as I am sure you have guessed I used
Pion Design paper for this layout. I distressed all the edges of the paper first with my prima distress tool then went around it with a color box chalk ink in a light brown. The roses are from I am Roses and for the larger rose, I colored it with a Shimmerz spritz spray called Treasured Hymn. I added a few loose pearls around the roses and cut out a flourish using the Cheery Lynn die (mini fanciful flourish-left). I cut it up into pieces and glued then down under the roses. I also added a piece of it to the left side of the card. The bird is one of the tiny wooden embellishments from Prima and I went over it with the same chalk ink that I used to distress the edges of the paper. The bow is a lace bow sticker by Jolees. I am so very happy with the way my page turned out.  Below is the sketch that I followed for this layout. 
 Beautiful sketch right?!?!?
Anyways I hope you come join in on this wonderful challenge. 
Thank you so much for stopping by and I hope you have a beautiful day.
Hugs
Shan


Monday, July 1, 2013

Card, Mini, and Altered Box

Good morning everyone. I know its been awhile since my last post but I am having issues trying to type up a post thru my google chrome. I guess I can not complain to much as I am finally able to post thru internet explorer. So today I have 3 projects to share with you. The first is a card and paperbag mini wallet I made for my mother in law. For The card and the mini I used the Authentique Cherish collection. This paper is absolutely gorgeous and has a lot of tags and cutouts for grandparents which made this paper perfect for this project.
 
Stamp: The Greeting Farm: Blush Babette
Roses: I am Roses
Sprays: Shimmerz
Pearls: Glass pearls from my stash
Butterflies and diecut circle: both came from a swap that I colored with Copics
Markers: Copics
 
 
Lace: Walmart
Ribbon roses: I peeled these off of a roll of sheer ribbon
Pearl Trim: Sa Crafters
Flatback Pearl hearts: Received in a swap
Butterfly: Recollections that I sprayed with some Shimmerz spritz
 
If you would like to see the inside of both these projects, I have a video that I will link below.
 
For my 3 project, I have altered a old pencil box style box for a dear friend of mine.
 
 Top view of box:
For this Box I used my all time favorite paper by Pion Design. I just love the soft romantic feel of this paper. The paper totally inspired me to make this beautiful heart with the pearls in the center. For the heart I started with a hallow chipboard heart from maya Road and covered the heart with the same paper as the box. I traced the heart with a piece of paper and glued it to the back of the heart and then added pearls to the center until I was happy with the look. I then filled the heart with glossy accents and added some to the top of the pearls which I love how it turned out. Kinda looks like the pearls were melting together in there and then topped it off with this beautiful key. I used a flourish die from cheery lynn designs and had colored the diecuts, I am roses Roses, Butterfly, and the metal corner pieces with a pearl watercolor paint that I purchased from amazon. I also added more of the beautiful glass pearls around the butterfly.
This is a view of the sides of the box. I added a beautiful metal piece that I added gesso on then went over with more of that beautiful watercolor to and added another I am roses small rose to the center of. The rose is also colored with the same watercolors. Then I added this beautiful flatback pearl trim from Sa Crafters. For the feet on the bottom of the box I used these beautiful flower bead caps and adhered them upside down. I really love how that turned out.
This is how the front of the box looks. I added a beautiful Prima resin piece that I had covered with gesso and again the watercolor paint on and some more of that beautiful Sa Crafters pearl trim.
 
Below is a link to the video of this box.
 
Thank you for stopping by and I hope you have a beautifully blessed day.
Hugs,
Shan


Thursday, June 20, 2013

Fathers Day Card.

Hello!
I am back to quickly share with you a fathers day card that I had made for my father.
I really love how it turned out.
 
Papers: Creative Imaginations
Dies: Spellbinders and memory box hot air balloon
Twine: From my stash
Metal corners: Recollections
Pearls: Recollections
Other: Glossy accents, alpha stamps, and chalk ink
 
Thank you for stopping by. I hope you have a beautiful day.
Hugs

Thursday, May 30, 2013

Tiny wire heart wreath embellishment

Good afternoon everyone. I hope you all are having an amazing week. I haven't been crafting much lately as we are preparing for a visit from my in laws in a couple of weeks and we can't wait to see everyone. And to be totally honest, my craft room is a disaster and I really need to get it cleaned up. I was able to work on a tiny heart wreath today as I have been going crazy not being able to craft. I just love how this turned out.


For this wreath, I used some green wire a friend had sent to me long ago. Im sorry i am not sure of the gauge of the wire but it is extremely easy to bend. So I twisted two pieces together and formed the shape of a heart. Then I painted over the heart with gesso and then a layer of white paint. I then took 2 clear wheat sprays and used a copic marker to color them pink and hot glued them to the wire frame. Then i started layering the roses over the wire gluing them down with my hot glue gun.The center rose was a paper rose from AC Moore and the rest of the roses are from I am roses. I then cut up a few pearl stamens and glued those into place. I also added stickles and glitter to the top of the heart and used stickles on the roses. This project was fairly quick to make. The longest part was allowing the gesso to dry. 

Thank you for stopping by. I hope you have a fantastic week. 
Hugs


Saturday, May 25, 2013

You gotta check it out.

Good morning all. I'm not here to share a project at the moment but I did want to let you all know about an amazing shop on zibbet. Most of you probably already know about her but for those of you that don't, Sa crafters has a fantastic shop with prices you can't beat, and let me tell you...every time I order, I always have my order on just a few days. Just thought id share with you all as who doesn't love having crafting goodness that doesn't make you go broke. Hope you all check her out. Have a beautiful weekend. 


Monday, April 29, 2013

Looking for fun challenges and swaps?

Good evening everyone. Not here with a project today but wanted to let you all know about a great site that has lots of fun challenges, inspiration, classes, and swaps. I hope to see you all there. 


Hope you all have a beautifully blessed week.
Hugs,
Shan

Friday, April 5, 2013

Handmade Lace Flower and Some Embellishments

Good Morning everyone. Today I wanted to share with you a hand made lace flower and some embellishments I created for a friend. 


This had started out being a lace flower for a friend and ended up blooming into this beautiful creation. 
My friend Barbara loves the vintage style and I sure hope she likes it. I used alot of beautiful laces and doilies that I had in my stash and topped it with a bottle cap that I created. I also added a few strands of lace and pearls to the back.

Below are some embellishments that I created for her as well using some printable images I purchased from Etsy. 

Thank you for stopping by. I hope you have a wonderful day. 

Thursday, April 4, 2013

Altered Tiny Balsa Box

Good morning everyone. I hope you all had a terrific night last night. Today I wanted to quickly share with you a Teeny Tiny little balsa box I altered. This is another project that I had completely forgotten to upload here. Things have just been really crazy here the last couple of months and I am so very glad that it is finally starting to slow down. 

Front View

 Top View

I wasn't too sure for the longest time what I was going to do with this adorable teeny tiny box but as soon as I received some washi tape that I had ordered online it all fell into place. I started out by painting this box with a light buttermilk color acrylic paint. When the paint dried, I covered the entire out side of the box with this gorgeous washi tape that I had purchased online. I added my favorite flat backed pearl trim from Sa Crafters to the outside edge of the lid and the bottom of the box. I cut apart a doily and layered it on top of the box, added a couple of skeleton leaves, and an I am Roses rose that I had colored with my favorite Lindys spray (cape cod coral). 

Below is a video on the project.


Thank you for stopping by and I hope you are having a fantastic week. 

Wednesday, April 3, 2013

Altered Mouse Trap Memo Holder

Good Evening all. Wanted to Quickly share a project that I made a while ago and again forgot to post of an altered mouse trap I created. I ran across these on the internet and rushed out and purchased some mouse traps. I love the way this turned out. 

For this mouse trap I started out painting the whole thing with a light buttermilk acrylic paint. I then mod podge some beautiful paper from My Minds Eye "Blush" collection and added some flat back pearl trim to the sides. I added a Tim Holtz key hole to the center and added 2 flat back pearls to it that I had purchased from Michaels dollar bin. I then added a tiny piece of a doily to the lower left corner and layered 7 I Am Roses roses to the bottom corner using beautiful sprays from Shimmerz. I added a beautiful Recollections butterfly to the middle and a bling flourish to the top. I then made a little dangle on the bottom using a Tim Holtz pearl and little dangle chain and added a Recollections key. 

Below is the video with more details and closer images. 


Thank you for stopping by and I hope you have a beautiful night. 


A wall hanging I created for a friend.

Good afternoon everyone. I hope you all are enjoying your week so far. 
I am here today to share with you a wall hanging I created for a friend a couple of months ago and silly me, I do not know how I never ended up posting photos. I love how this turned out. 


For this wall hanging I used a Maya Road heart shaped chipboard page from an album that I had purchased many years ago. I covered the chipboard with beautiful paper from My Minds Eye "Blush" collection. I added some texture to the heart using some texture paste and a stencil from Sa Crafters. I then added lace around the whole heart and created a banner that spells out her name using paper from the same collection. I added some beautiful roses from I Am Roses and added a heart and key charm to the banner. I added some feathers and layered a Prima Cherub that I painted and sprayed with Lindys stamp gang. For the bottom, I attached a bit of seam binding, a Prima dangle that I took off one of their flowers and added some pearls too, a beautiful pink crystal to the bottom and added some pearl trim. I will post the video I recorded below for better images and details to this project. 


Thank you for stopping by. I hope you have a beautiful day. 


Sunday, March 31, 2013

Altered Balsa Box

Good morning and Happy Easter. 
I know it has been awhile since my last blog post but we have finally been blessed with being homeowners. So between moving, unpacking, and organizing, there has not been a lot of time to craft lately. But things are starting to get a little chaotic around here and have had a little me time to craft. 

Today I want to share with you my very first altered balsa box I created for a friend. I really hope she likes it.

For this box I used a sheet of beautiful paper by Pion Designs that I have been hoarding for about a year now from the "From my heart II" collection. It is one of my favorite collections from them and breaks my heart that I can not find it here in the US. I distressed all the edges with my prima distress tool. If you dont have one, you should really invest in one. I love it. I then distressed it even futher with Tim Holtz distress ink. I believe it is the rose color. I added some flat back pearl trim from Sa Crafters, glued down a couple of skeleton leaves that a friend sent me, and used several roses from I am Roses. I colored all the flowers with Lindys Stamp Gang and Shimmerz Sprays. I then glued down several loose pearls from my stash around the roses. I also added a Recollections pearl flourish and a metal butterfly that I had purchased from Ebay. On the front of the box I painted a resin rose and glued that to the front of the wooden button and for the closure I used Tim holtz trim that i had dyed with Shimmerz paint. 

Thank you so very much for stopping by and I hope each and every one of you have a Beautiful Blessed Easter. 


Tuesday, February 12, 2013

My Recent Projects

Good morning everyone. I just wanted to share with you all a few projects I have made over the last few weeks. I know I havent been around much but we recently moved and are still trying to close on our house. Not to mention all the unpacking and such. 

I really enjoyed the way these all turned out. Please let me know if you have any questions.

This is an altered envelope bag I made to send a friend a few goodies in.

 I used:
Black envelope
Prima paper
Tim Holtz bird cage die
I Am Roses flower
Lace
and eyelets.

Altered glassine bag
 I used:
Glassine bag from a friend
paper doily
prima note card 
Lace
prima heart
Recollections bling.

Handmade rose Topiary
 I used a Styrofoam ball
Lots of I Am Roses roses
Lindys Cape Cod Coral 
Lace
Pearls
Doily
clay angel
Pearl Stamens

Altered paper bag
 I used: 
Gesso
Stencil
Clay angel I made
Doily
Lace 
scallop punch
Prima paper scrap
feather

Altered Jar
I used: 
Ball Jar
Vintage print found online
Lace
Pearl Trim from Hobby lobby online
I Am Roses Flowers
Recollections Pearl
Recollections tear drop pearls
Handmade lace butterfly
Lindys Stamp Gang: Cape Cod Coral
Mod Podge
Gesso

Thank you for stopping by my blog. I hope you all are having a wonderful week
Hugs

Monday, November 12, 2012

Pion Design Sketch Challenge


Good evening everyone.
 Tonight I am super excited to share with you a card that I am entering for Pion Designs Sketch Challenge. In case you haven't noticed in my last couple of post that I am in Luv with these papers. They are (in my opinion) the most GORGEOUS papers out on the market.. Don't you agree?? Well I have to be honest. I didn't even know about them until a friend of mine sent me several and I was so afraid to cut into them for the longest time because I didn't want to part with the few that I had. Then I thought to myself, I cannot not create with something this beautiful. I must admit tho I wish I had more. Anyways, I am rambling on. As I said, it is a sketch challenge and the winner will receive their upcoming paper collection... So I am crossing my fingers, my eyes, my toes, well anything that I can possibly cross hoping to win. So please y'all, wish me luck. 
Here is the sketch to follow:
♥ To enter the challenge, create a layout and/or a card based on the sketch using your favorite Pion Design Papers. You may flip and rotate the sketches, change or replace the shapes, but please make sure the general layout is recognizable.
♥ Share a direct link to your creation/s, not just your blog, using the InLinkz feature at the end of this post. Use one InLinkz for cards and the other for layouts. Please, no back linking.
♥ The challenge starts today, ends at midnight Sunday, 25 November 2012, and is open to all scrappers all over the world!
♥ The winning creations will be announced on Tuesday, November 27.

 And for my card:

Now I know it isn't exact and I do hope that it doesn't make that big of a difference, but if it does, I enjoyed the challenge and love how it turned out. Hopefully my grandmother will as well as I am sending it off to her in the mail. 

Products used on this card: 
Paper: Pion Designs- "Roses" From my heart II 6x6
Banner: Pion Designs- " Tags"- From my heart II
Butterflies: Pion Designs
Image: An image recieved in a RAK
Flowers: I Am Roses
Laces: From a local shop
Pearls: from the dollar bin at Michaels
Misc: UTEE, Lindys (Cape cod and sea grass green), and stickles. 

Thank you for stopping by and remember to head on over to Pion Designs Blog and join the challenge. I hope you all have a very blessed week. 
Hugs


Tuesday, October 23, 2012

Birthday Card

Hello everyone. I hope you all are having a beautiful day today. 
Im sorry this will be a short post but today is my sons birthday and I still need to get ready for his birthday party,but I wanted  to share with you a card that I made for my moms birthday in a few days.


Paper: Pion Design
Butterflies: Pion design paper that I fussy cut and then added UTEE to.
Paper Doily: Martha Stewart
Flowers: IAR
Crochet doily: Ebay 
Lace: From a local store
Pearl Trim: Hobby Lobby

Thank you for stopping by. I hope you have a very blessed week. 
Hugs

Sunday, October 14, 2012

Altered Wooden Bag

Hello Everyone. I hope you all have had a beautiful weekend. I know I havent been as active as I was in doing crafts or cards but as most of you know I have health issues and with that comes a weak immune system. Well hubby or son (not sure which), brought home a cold that they were able to get over in 2 days and I am still fighting this thing after a week and a half. lol. Lucky them for being over it already. Anyway, today I wanted to share with you a altered wooden bag that I had made. I just love these wooden bags from Michaels and they have been super hard to get ahold of here and they finally got some more in. Yay!!! I am  so very excited. 


For this bag, I started out by painting it with a mix of cream and a very light brown mixture of paint. I then mod podged on paper this beautiful paper from the Prima Fairy Belle paper pad. I added some vintage lace that I trimmed out of an old hankie that belonged to my great grandmother and hot glued some pearls around the edges of the bag. The flowers in the lower right hand corner are flowers from I am roses that my dear friend Lineca sent to me as well as a couple of roses from recollections. I added a few loose pearls between some of the roses. I added a white feather and layered a prima chipboard fairy from the collection. The lace bow in the upper right of the bag is something I had in my stash and added a couple of strands of pearls and a resin rose to the center. 


This is a side view of the bag. I used a couple of butterflies that Lineca had punched for me that matched the paper line and added a few rhinestones and pearls to them. 

I had so much fun making this box and cant wait to start another. Thank you for taking your time to visit my blog. Your support means the world to me. I hope you all have a wonderful week ahead.


Saturday, September 29, 2012

Birthday Card

Good morning everyone. I hope everyone is having a beautiful weekend. I wanted to stop by really quick and share with you a card I created for my landladys birthday. She is such an amazing woman with a heart of gold. 


Close up of the center of the card


Paper: Pion Design
Chipboard heart: Maya Road
Flowers: IAR
Border punch: Martha Stewart
Misc: Paper clay angel I created, Lindy Spray, Paper Doily, and lace from a local store.

Thank you for stopping by. 
God Bless.

Sunday, September 16, 2012

Altered Frame / Wall Art

Good morning everyone. I hope you all are enjoying your weekend. 

Today I would like an altered project with you that I made for my Landlords Birthday. She has been so very sweet to us and has become like a second mom to me. I really wish I had taken a before picture of this before I altered it. The frame was a brassy gold color and the center was this really ugly brown with some wording painted on it. I am super happy with the way this turned out and hope that she will like it just as much. 


For the frame I painted it white. After it dried I applied a coat of a champagne gold over it and allowed that to dry. Then I added a white wash  over the top of that. I added a piece of my minds eye paper over the ugly brown center and cut out letters from my cricut. I used mod podge  to adhere the paper and the letters down and hot glued pearl trim around the entire frame and the center frame. All the flowers used in this project came from my dear friend Lineca, with the exception of 4 recollection rose I had in my stash. I removed the centers from the cherry blossoms and added pearls to the center of those and glued a couple of loose pearls here and there. I also adhered a little cherub that I made to the top left hand corner of the frame right above the 3 little roses. 

I hope you all have a fantastic week.
Hugs! 

Wednesday, September 5, 2012

Shabby Chic Ornament

Hello everyone. I know I have not been around for awhile. This darn illness has been acting up again so I have been in bed alot and have not had the energy to do anything. :( .. Then the last couple of weeks hubby and my son have been fighting a cold, But are now much better!

Today I wanted to share with you a Shabby Chic Ornament I made. I have been watching a bunch of talented ladies on youtube and came across a video that inspired me to make this. She is CraftsDotCupCake on YouTube. You can check out her video here. Thank you Becca for the inspiration!


 For the base of this I used a maya road chipboard heart frame and painted it white. I then backed it with a gorgeous shabby chic paper that was given to me by my dear friend Lineca. I then added a little pearl dangle on the bottom that I created out of some pearls and a little crystal. 


 I then added these beautiful I Am Roses that Lineca sent to me along the frame.


This Cherub was a gold cherub button that came in a mixed victorian pack that my husband had got me last year. I just painted it with white paint and then added a bit of soft gold paint to it. I really love how it turned out. 


I then added some beautiful lace that I picked up at a local store here in NC. I am super excited with the way this turned out. 

Thank you for stopping by. I hope you all have a fantastic week. 


Friday, July 6, 2012

My First Altered Birdhouse.

Good Morning Everyone. I hope everyone had a safe and happy 4th of July. 
I wasnt feeling real well so spent most of the day in bed and then made dinner for us and the next door neighbor. We didnt do any fireworks but my son did play with sparklers. They are his favorite. 

Yesterday I spent the morning altering my first birdhouse. I am really happy with the way it came out considering I am starting all over with my scrapbooking supplies after moving cross country a year ago. Wish I would have had some gorgeous WOC flowers to put on it but I think the Recollection roses worked well. 

I purchased this wooden bird house from Michaels and painted it with a really soft pink, added crackle medium, and then topped it with an ivory white. 


The butterfly on the top is a butterfly I made out of some lace I purchased at Walmart. The flowers on the roof are recollection roses from Michaels. The lace was a really beautiful dainty cream color lace I picked up at a local shop here and added some pink lindys spray to it. The pearl trim was purchased online from Hobby Lobby.


For the bottom I added some beautiful Venise Lace that I picked up at walmart and dyed it with some more of the Lindys spray. I then added some more pearl trim to the top of the lace and added a gardenia flower ( dying it with more of the lindys), and added a recollection rose to the top of the gardenia. I also added some beauitful pink / clear wheat spray that I had picked up at AC Moore and a couple pieces of a pearl spray.


For the Roof I added some of this beautiful rosette trim and sprayed it with some Lindys as the trim was originally white. I took some of the pearl trim and cut it up to add the pearls to the center of the rosettes. The sides and the back of the birdhouse I left plain as I really love the crackle look. 

Thank you for stopping by and I hope you all have a wonderful weekend. 
God Bless!

Tuesday, July 3, 2012

My Minds Eye Altered Notebook


Hello everyone. I  hope you all are able to stay cool from all this heat we are having. Although it has cooled down some, I am still miserably hot. 

Tomorrow is the 4th of July and my son has been driving me nuts about lighting off fire works. We are having  our neighbor over and will be BBQing steaks and having corn on the cob, mashed potatoes, and pasta salad.    I am actually making my mouth water thinking about dinner tomorrow. 

Well enough of my rambling, I wanted to share with you a altered notebook that I made for a dear friend. I am so nervous to send it to her as she is such a super talented crafter so I hope she likes it. 


 Thank you for stopping by my blog. I hope for those of you that are celebrating that you have a safe and happy 4th of July.