Good morning everyone. I have some really exciting news to share with you all. Since the first time I ran across Inspired by Stamping stamps it has been a dream of mine to be a part of their design team and that dream has come true. I am feeling so very blessed right now and I am looking forward to working along side the other wonderful design team members. Please head on over to the Inspired by Stamping Blog and check out the beautiful products they carry along with the current challenges. I hope you all are having a beautiful weekend.

Sunday, August 31, 2014
Tuesday, August 26, 2014
A couple of cards
Good morning everyone. I hope you are all having a beautiful week.
I wanted to stop by and share with you a couple more starburst cards I have made. I am having a blast making them and I just love how they turned out.
.jpeg)
For the card above, I used paper from My Minds Eye, white ribbon i picked up from Walmart, an ek success border punch, Martha Stewart butterfly punch and a beautiful sentiment stamp from Inspired by Stamping .

and for this last card, I used gorgeous paper that was gifted to me by a friend, a Martha Stewart border punch, lace gifted to me from a dear friend, a black recollection rose, and another Inspired by Stamping beautiful sentiment stamp from the same set as the first photo.
Thank you so much for stopping by my blog. Please let me know if you have any questions. I hope you all have a wonderful week.
Hugs
The Greeting Farm "Hello" Card
Good morning all. I hope you are all having a wonderful day.
I have seen alot of starburst / sunburst designs and I ran across a tutorial on how to make these. I have to say, they are really addicting. I have alot of practicing to do but still love how it turned out.
.jpeg)
Isnt it adorable? Below is the list of items I used to make this card. Thank you for stopping by.
Paper: My Minds Eye
Doily: from Michaels
Hello die cut: gifted to me by a friend
Stamp: The Greeting Farm
Markers: Copics
Pearl hearts: gifted to me in a rak
Sunday, August 17, 2014
Inspired by stamping monthly challenge
Good morning everyone. I hope you all are having a beautiful weekend. Today I want to share with you a card I created for Inspired by stampings monthly challenge. They have 3 challenges to work with. A sketch challenge, a chevron challenge, and a color challenge. Today I have chosen to do the color challenge. I think the colors are so very beautiful.

For this card I started with a 4.5" x 5.5" white card base. I used beautiful pion designs paper on this card as I felt the colors in the papers really matched the challenge well. I added a beautiful paper doily from my stash and punched a circle out from the same paper collection to layer on top of the doily. The adorable little girl is a greeting farm stamp and I colored her up with my copic markers, fussy cut her out, then added her to the center of the circle on pop dots. On the bottom I stamped the beautiful sentiment stamp by inspired by stamping onto another piece of paper from the pion designs collection then attached the sentiment to the back of a little wooden fram from prima. I just love inspired by stampings stamps as there is always a perfect stamp for every occasion. I finished off the card by adding some photo corners and butterflies I punched out along with a beautiful lace bow sticker I had in my stash. I really like the way this card turned out.
Make sure you head on over to Inspired by Stampings Challenge blog to play along. I don't believe you have to use their stamps to play along at this time but you can find all the details by visiting http://joannamunster.com/2014/08/15/ibsic-85/ . Thank you so much for stopping by and I hope you have a beautiful day.
🎀hugs🎀
Friday, August 15, 2014
Bottlecap charms
Good morning all. I hope you all had a wonderful week. I don't know about you but this week flew by for me. Didn't get much crafting done as my son goes back to school next week. So I have been spending as much time as I can with him and have to get last min supplies. I did however get into the craft room to make a couple of bottlecap charms for a swap I am doing. I am still working on the other embellishments that go with it. I really hope she loves them as much as I have enjoyed making them for her. 
For these bottle caps it have flattened, spray painted white and punched two holes in them. I then glued two beautiful images that I had purchased from an etsy store and I used a bit of crystal stickles around the edges and on the tiny flowers to add a bit of sparkle. When the stickles had dried, I filled the center with glossy accents and while I waited for that to dry, I made some beautiful bead charms to dangle from the bottom. Once the glossy accent had dried, I used a couple of jump rings to attach the charms and lobster clasps then added some tiny pearls all around the bottle cap edges along with some beautiful little embellishments. To finish off the bottle caps, I added an adorable little sheer flower to the back.
Well, that's all I have for today. I greatly appreciate you taking time to stop by my blog. I hope you all have an amazing weekend.
🎀hugs🎀
Sunday, August 10, 2014
Inspired by stamping DT Call Entry
Good afternoon everyone. I promise this is my last post of the day. The other day I was checking out one of my favorite stamp companies face book page and found out they are having a design team call. I was over the moon when I found out as I have wished for the opportunity to design for them. So I am keeping my fingers, toes, arms, eyes all crossed hoping to have a chance. Lol. I am really happy with how the card I created for it turned out however, I did alter the digital paper I used as I had nothing in my stash that was mint green. On the paper, I had altered the leaves on the roses to a beautiful mint green, but no matter how light I went with the leaves, they all printed out darker than they were designed. I hope that doesn't hurt my chances to be considered. So below is the inspiration photo that they ask you to follow....


And here is my card....
Both pattern papers were digital papers I had purchased from a seller on etsy. I then stamped and heat embossed a beautiful sentiment stamp from inspired by stamping onto a piece of ribbon. I tried to emboss it with a beautiful blush color that matched the paper but it didn't show up well. I layer the ribbon over a piece of cardstock. I then added a couple of pink and white recollection pearl flourishes and a couple of heart flat back pearls to the top right corner of the card. The white rosette was from my stash and the rose is from WOC.
Thank you so much for stopping by and I hope you all have a beautiful night.
🎀hugs🎀
Beautiful altered night light
Good afternoon all. This is going to be a quick post to share with you a beautiful little night light I created. I just love how this turned out.

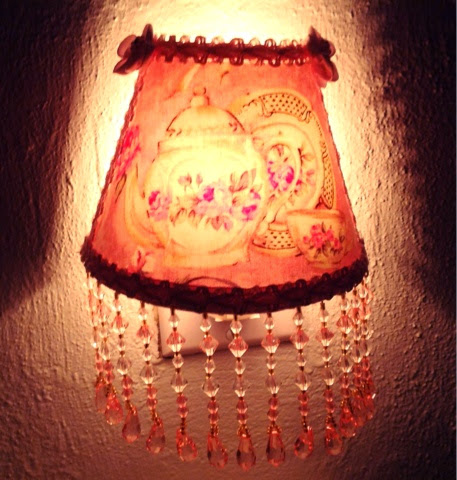
I had ordered this little night light from amazon last week and it arrived within a couple of days. I altered it with this really beautiful tea set and roses fabric, added the gorgeous beaded trim to the bottom, trimmed it with a little pink trim and added a couple of satin flowers to the top corners. It is so beautiful at night as well don't you think?
Well thank you for stopping by and I hope you have an amazing week.
🎀hugs🎀
Shabby chic dream catcher (3rd post for the day)
Hello again! I am back to share with you my 3rd post for the day. Trying to catch up on the few items I did over the summer. So for this post I wanted to share with you a shabby chic dream catcher I created for a swap with a dear friend of mine. I originally wanted to use a doily for the center as I had done before but couldn't find any at the time that would fit the small metal ring I used and didn't have enough thread to crochet my own. But that's ok. I still love how it turned out!!!
I first started with a metal ring I had purchased at michaels. Then I wrapped the ring in cotton batting. Once that was covered, I then tore strips of fabric to cover the batting. For the center, I used crochet thread and added a couple of crystal beads. I also created a handmade lace butterfly from some lace I purchased at walmart to the center of the dream catcher. On the bottom, I tied lots of beautiful laces, fibers, and seam binding as well as some beautiful beads and feathers. I then finished off the dream catcher by adding a couple of pink flowers/ leaves that I had purchased on a zibbet store as well as a beautiful white flower gifted to me by my dear sweet friend Lydia. I just love making these and love how beautiful this turned out. Please let me know if you have any questions.
Thank you for stopping by and I hope you have a beautiful day.
🎀hugs🎀
A beautiful tag ( my second post for the day)

Paper: Bo Bunny Isabella Collection
Die cut sentiment: same bo bunny collection
Large pink butterfly: prima
Flatback pearls: Natasha's scrapbook korner
Tiny butterflies: Martha Stewart butterfly punch
Doily: gifted to me from my friend Toni
Laces: from my stash and hand dyed by me
Metal corners: purchased from michaels and I heat embossed them white
Pearl sprays: made myself following nurse Tara tutorial
Flower: WOC rose gifted to me by my friend Ana
If you have any questions please let me know. Thank you for stopping by and I hope you have a beautiful day.
🎀hugs🎀
I'm back and I have a few projects to share.
Good morning everyone. I hope you all are having a wonderful weekend. I know I have been gone awhile. With summer here, I have been trying to spend as much time with my husband and son as possible so I had not been crafting much outside of swaps and RAKs that I had worked on. I can not believe how fast this year has gone by. In less than two weeks my son will be starting jr high. He is so nervous to be starting a new school with new teachers, but it know he will do great!
So today I wanted to share with you a couple of items that I created for a dear friend as well as a swap we had done. I just love how everything turned out.
Starting with the swap, we decided to swap altered spoons and I just love how these turned out. I would love to find some baby spoons and make some ornaments for a shabby chic christmas tree. Wouldn't that be cute!


So for these spoons, I used a couple of beautiful laces from my stash, some rosette trim, flat back pearls, WOC flowers, seam binding, and some lace butterflies. For the pink spoon, I hand dyed the laces used on that spoon.
The next items I worked on are items I made for her just because. She really loved my altered cassette stick pin case so I wanted to make her one along with a few matching embellishments.
Starting with the upper left corner... I altered a binder clip using this beautiful paper from Maja designs, added a tiny heart lace to the top, a crochet heart yo the corner as well as a few little beautiful WOC roses, and some pearl stamens. I crocheted around the entire clip on both sides and added another little lace butterfly. The note card is a prima note card that I backed with white cardstock and pinched around with a Martha Stewart punch. To the right of that is the altered stick pin cassette case I made for her. For this I used the same Maja Design paper, a couple of metal corner embellishments that I heat embossed white, a spell binders die cut, and a prima cherub. The laces used on this were laces in my stash. The bottom left corner I created a bottle cap charm using an adorable image from etsy. Then created a bunch of pearl dangles and a little angel for the bottom. I also added a tiny pearl heart on the side of the bottle cap with a teeny tiny pink resin rose. For the bottom right photo, I painted a couple of wooden clothes pins, then added more of the same Maja Design paper, had hubby drill a tiny hole in both and created small dangles for them. In the center of the clothes pins, I added a couple of pieces of lace that I had cut up and added more pearls, and WOC flowers and some pearl stamens to those as well. I just love how these all turned out and I can not wait for her to receive them.
The last item I made was a tiny little cereal box to hold all the items in the above picture. I made this box following Bonas tutorial on YT. It's rather plain but still love how it turned out.
Anyway that is all for now. I thank you for stopping by and I hope you all have a beautifully blessed weekend.
🎀Hugs🎀
Subscribe to:
Posts (Atom)