Monday, November 12, 2012

Pion Design Sketch Challenge


Good evening everyone.
 Tonight I am super excited to share with you a card that I am entering for Pion Designs Sketch Challenge. In case you haven't noticed in my last couple of post that I am in Luv with these papers. They are (in my opinion) the most GORGEOUS papers out on the market.. Don't you agree?? Well I have to be honest. I didn't even know about them until a friend of mine sent me several and I was so afraid to cut into them for the longest time because I didn't want to part with the few that I had. Then I thought to myself, I cannot not create with something this beautiful. I must admit tho I wish I had more. Anyways, I am rambling on. As I said, it is a sketch challenge and the winner will receive their upcoming paper collection... So I am crossing my fingers, my eyes, my toes, well anything that I can possibly cross hoping to win. So please y'all, wish me luck. 
Here is the sketch to follow:
♥ To enter the challenge, create a layout and/or a card based on the sketch using your favorite Pion Design Papers. You may flip and rotate the sketches, change or replace the shapes, but please make sure the general layout is recognizable.
♥ Share a direct link to your creation/s, not just your blog, using the InLinkz feature at the end of this post. Use one InLinkz for cards and the other for layouts. Please, no back linking.
♥ The challenge starts today, ends at midnight Sunday, 25 November 2012, and is open to all scrappers all over the world!
♥ The winning creations will be announced on Tuesday, November 27.

 And for my card:
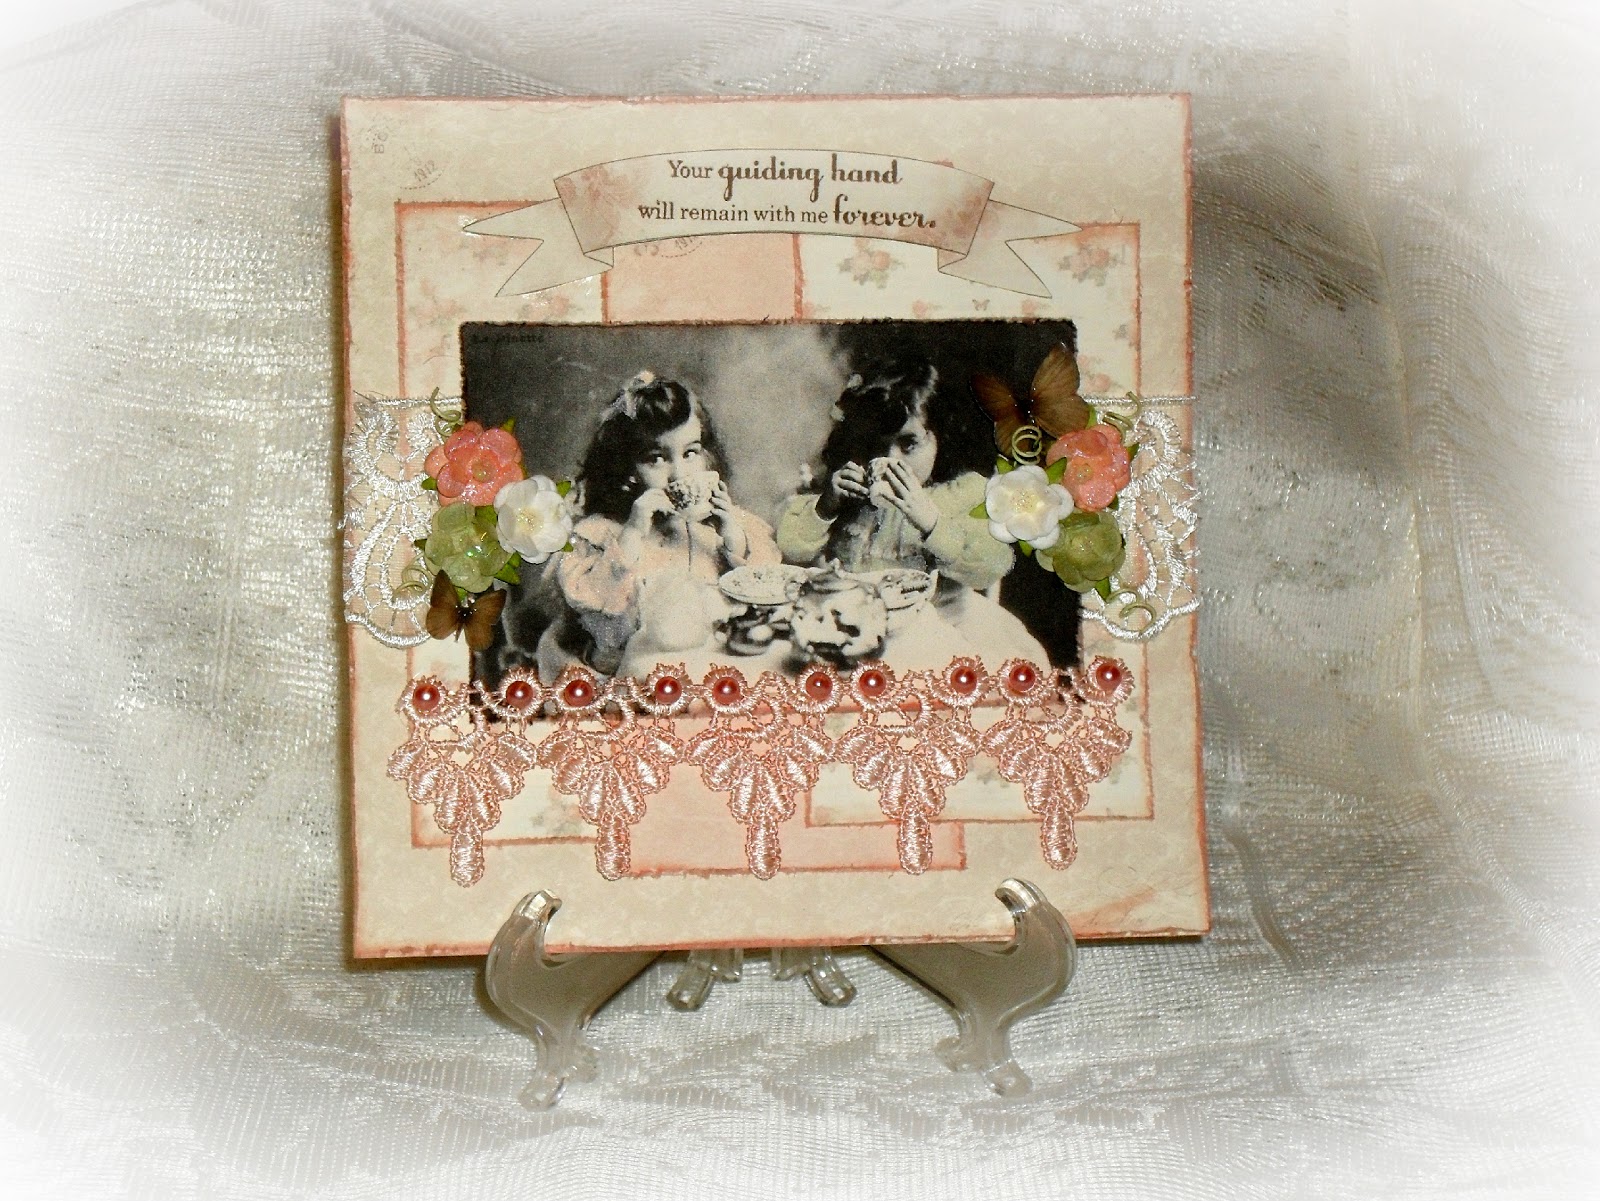
Now I know it isn't exact and I do hope that it doesn't make that big of a difference, but if it does, I enjoyed the challenge and love how it turned out. Hopefully my grandmother will as well as I am sending it off to her in the mail. 

Products used on this card: 
Paper: Pion Designs- "Roses" From my heart II 6x6
Banner: Pion Designs- " Tags"- From my heart II
Butterflies: Pion Designs
Image: An image recieved in a RAK
Flowers: I Am Roses
Laces: From a local shop
Pearls: from the dollar bin at Michaels
Misc: UTEE, Lindys (Cape cod and sea grass green), and stickles. 

Thank you for stopping by and remember to head on over to Pion Designs Blog and join the challenge. I hope you all have a very blessed week. 
Hugs


Tuesday, October 23, 2012

Birthday Card

Hello everyone. I hope you all are having a beautiful day today. 
Im sorry this will be a short post but today is my sons birthday and I still need to get ready for his birthday party,but I wanted  to share with you a card that I made for my moms birthday in a few days.


Paper: Pion Design
Butterflies: Pion design paper that I fussy cut and then added UTEE to.
Paper Doily: Martha Stewart
Flowers: IAR
Crochet doily: Ebay 
Lace: From a local store
Pearl Trim: Hobby Lobby

Thank you for stopping by. I hope you have a very blessed week. 
Hugs

Sunday, October 14, 2012

Altered Wooden Bag

Hello Everyone. I hope you all have had a beautiful weekend. I know I havent been as active as I was in doing crafts or cards but as most of you know I have health issues and with that comes a weak immune system. Well hubby or son (not sure which), brought home a cold that they were able to get over in 2 days and I am still fighting this thing after a week and a half. lol. Lucky them for being over it already. Anyway, today I wanted to share with you a altered wooden bag that I had made. I just love these wooden bags from Michaels and they have been super hard to get ahold of here and they finally got some more in. Yay!!! I am  so very excited. 


For this bag, I started out by painting it with a mix of cream and a very light brown mixture of paint. I then mod podged on paper this beautiful paper from the Prima Fairy Belle paper pad. I added some vintage lace that I trimmed out of an old hankie that belonged to my great grandmother and hot glued some pearls around the edges of the bag. The flowers in the lower right hand corner are flowers from I am roses that my dear friend Lineca sent to me as well as a couple of roses from recollections. I added a few loose pearls between some of the roses. I added a white feather and layered a prima chipboard fairy from the collection. The lace bow in the upper right of the bag is something I had in my stash and added a couple of strands of pearls and a resin rose to the center. 


This is a side view of the bag. I used a couple of butterflies that Lineca had punched for me that matched the paper line and added a few rhinestones and pearls to them. 

I had so much fun making this box and cant wait to start another. Thank you for taking your time to visit my blog. Your support means the world to me. I hope you all have a wonderful week ahead.


Saturday, September 29, 2012

Birthday Card

Good morning everyone. I hope everyone is having a beautiful weekend. I wanted to stop by really quick and share with you a card I created for my landladys birthday. She is such an amazing woman with a heart of gold. 


Close up of the center of the card


Paper: Pion Design
Chipboard heart: Maya Road
Flowers: IAR
Border punch: Martha Stewart
Misc: Paper clay angel I created, Lindy Spray, Paper Doily, and lace from a local store.

Thank you for stopping by. 
God Bless.

Sunday, September 16, 2012

Altered Frame / Wall Art

Good morning everyone. I hope you all are enjoying your weekend. 

Today I would like an altered project with you that I made for my Landlords Birthday. She has been so very sweet to us and has become like a second mom to me. I really wish I had taken a before picture of this before I altered it. The frame was a brassy gold color and the center was this really ugly brown with some wording painted on it. I am super happy with the way this turned out and hope that she will like it just as much. 


For the frame I painted it white. After it dried I applied a coat of a champagne gold over it and allowed that to dry. Then I added a white wash  over the top of that. I added a piece of my minds eye paper over the ugly brown center and cut out letters from my cricut. I used mod podge  to adhere the paper and the letters down and hot glued pearl trim around the entire frame and the center frame. All the flowers used in this project came from my dear friend Lineca, with the exception of 4 recollection rose I had in my stash. I removed the centers from the cherry blossoms and added pearls to the center of those and glued a couple of loose pearls here and there. I also adhered a little cherub that I made to the top left hand corner of the frame right above the 3 little roses. 

I hope you all have a fantastic week.
Hugs! 

Wednesday, September 5, 2012

Shabby Chic Ornament

Hello everyone. I know I have not been around for awhile. This darn illness has been acting up again so I have been in bed alot and have not had the energy to do anything. :( .. Then the last couple of weeks hubby and my son have been fighting a cold, But are now much better!

Today I wanted to share with you a Shabby Chic Ornament I made. I have been watching a bunch of talented ladies on youtube and came across a video that inspired me to make this. She is CraftsDotCupCake on YouTube. You can check out her video here. Thank you Becca for the inspiration!


 For the base of this I used a maya road chipboard heart frame and painted it white. I then backed it with a gorgeous shabby chic paper that was given to me by my dear friend Lineca. I then added a little pearl dangle on the bottom that I created out of some pearls and a little crystal. 


 I then added these beautiful I Am Roses that Lineca sent to me along the frame.


This Cherub was a gold cherub button that came in a mixed victorian pack that my husband had got me last year. I just painted it with white paint and then added a bit of soft gold paint to it. I really love how it turned out. 


I then added some beautiful lace that I picked up at a local store here in NC. I am super excited with the way this turned out. 

Thank you for stopping by. I hope you all have a fantastic week. 


Friday, July 6, 2012

My First Altered Birdhouse.

Good Morning Everyone. I hope everyone had a safe and happy 4th of July. 
I wasnt feeling real well so spent most of the day in bed and then made dinner for us and the next door neighbor. We didnt do any fireworks but my son did play with sparklers. They are his favorite. 

Yesterday I spent the morning altering my first birdhouse. I am really happy with the way it came out considering I am starting all over with my scrapbooking supplies after moving cross country a year ago. Wish I would have had some gorgeous WOC flowers to put on it but I think the Recollection roses worked well. 

I purchased this wooden bird house from Michaels and painted it with a really soft pink, added crackle medium, and then topped it with an ivory white. 


The butterfly on the top is a butterfly I made out of some lace I purchased at Walmart. The flowers on the roof are recollection roses from Michaels. The lace was a really beautiful dainty cream color lace I picked up at a local shop here and added some pink lindys spray to it. The pearl trim was purchased online from Hobby Lobby.


For the bottom I added some beautiful Venise Lace that I picked up at walmart and dyed it with some more of the Lindys spray. I then added some more pearl trim to the top of the lace and added a gardenia flower ( dying it with more of the lindys), and added a recollection rose to the top of the gardenia. I also added some beauitful pink / clear wheat spray that I had picked up at AC Moore and a couple pieces of a pearl spray.


For the Roof I added some of this beautiful rosette trim and sprayed it with some Lindys as the trim was originally white. I took some of the pearl trim and cut it up to add the pearls to the center of the rosettes. The sides and the back of the birdhouse I left plain as I really love the crackle look. 

Thank you for stopping by and I hope you all have a wonderful weekend. 
God Bless!

Tuesday, July 3, 2012

My Minds Eye Altered Notebook


Hello everyone. I  hope you all are able to stay cool from all this heat we are having. Although it has cooled down some, I am still miserably hot. 

Tomorrow is the 4th of July and my son has been driving me nuts about lighting off fire works. We are having  our neighbor over and will be BBQing steaks and having corn on the cob, mashed potatoes, and pasta salad.    I am actually making my mouth water thinking about dinner tomorrow. 

Well enough of my rambling, I wanted to share with you a altered notebook that I made for a dear friend. I am so nervous to send it to her as she is such a super talented crafter so I hope she likes it. 


 Thank you for stopping by my blog. I hope for those of you that are celebrating that you have a safe and happy 4th of July. 


Saturday, June 23, 2012

Mini Album

Hello everyone. I hope you all are having a wonderful weekend. 

Today I want to share with you a mini album I created using the very talented Mariana's Tutorial. Thank you so very much Mariana. When I saw her mini album I knew I wanted to make one right away so I had asked her if she would mind making a tutorial as well as a few other people, she was such a sweetheart and made one a few days later. You can find her tutorial here.

I would also like to send a huge thank you to Tamara @ http://scrappingcarolina.ning.com/ For the wonderful papers used in this mini.


I am so very happy with how this came out. I hope you all like it as much as I do.


Friday, June 15, 2012

Fathers Day Card

Hello everyone. I hope you are all doing well. 

A few days ago, this amazingly talented crafter named Leanne made her husband a gorgeous card and configuration box which inspired me to make a card for my father.  
I really love how this card turned out and hopefully it isnt to girly. I have been hoarding this clock for months now. We are very limited on the things that our Michaels carry and they only had 2. 


Paper: Black card stock, Cream card stock, and Prima almanac paper.
Embossing folder: Tim Holtz patchwork folder
Flower: Trim from FrogFeathers etsy shop.
Button: purchased from Michaels 
Leaves: were purchased from AC Moore in the wedding section
Gears: Printed from Google images and cut out
Clock: Michaels
Stamp: Studio G
Spellbinders: fancy tags
Lindy's Stamp Gang: Wake me up before you go gold, Cocoa bean copper
Misc: Gold Rub N Buff, Tim Holtz chain, Web ribbon purchased from E Bay


Thank you for stopping by. I hope you all have a wonderful weekend and God Bless.

Monday, June 11, 2012

Toilet paper roll Mini

Good morning everyone. I hope everyone had a wonderful and safe weekend. 
Today I would like to share with you a toilet paper roll mini that I made for my friend for her birthday. This is my first one I have made and I didn't realize how challenging it would be to create something so small. But I had a lot of fun making it and loved the way it turned out. 


For this mini I used the Bo Bunny "Enchanted" collection. The I love you stamp is from Studio G and I added glossy accents to the top of it. I added stickles to the design around the sentiment and glued some Bling trim that I purchased at micheals to the top and bottom of the mini. The Bow was purchased in a 12 pack at Walmart and the roses are from Recollections. I embellished the binding ring with Black and white tulle and created a little dangle charm.


The ticket gives a space for a photo and there is a place for journaling on the back. I used a Tim Holtz grungeboard flourish. I colored the flourish with black distress ink and added silver rub n buff  lightly to the top. The butterfly is a cut from a friend and I added some pearls to it. 


The sentiment under the ticket was a die cut that was from a Color Bok collection. 


The frame was also from a friend of mine and I backed it with a piece of acetate. I then added glossy accent to the top of the frame and embellished it with another little bow. 


This is another die cut that a friend cut for me and I used a leaf punch to punch out 3 silver leaves, distressed the edges with black distress ink,  and added an adorable fabric flower that I had purchased from AC Moore. 


For this page, I created 2 tags with a sizzlet die I have and embellished them both with these gorgeous flower buttons I found at micheals. I used a piece of lace that I had in my stash to make a pocket and added 3 recollections roses to the lace. I lined the bottom of the lace with a pearl trim I purchased from Hobby Lobby on line and colored the pearls with my silver alcohol ink. 


Above is a picture of the page with the 2 tags taken out. 


I used another diecut that my friend had cut for me and cut out a circle with my spellbinders die for a spot for a photo. I again cut out a couple more leaves and added a black prima flower. I also layered an acrylic flower to the top of the prima flower which I altered using the silver alcohol ink. 


For this page, I used a frame that I found @ www.svgcuts.com/blog. Because of how delicate the lines were I mod podged down the frame and a photo can be glued to the center of the frame. 


I think this page turned out so beautiful. The black lace is from hobby lobby and I added some of that bling trim from walmart to the center of it. I also added 2 beautiful fabric flowers I found at walmart to the sides of the lace trim. Tucked under the trim is a little accordian folded mini that she can add 7 photos/ journal places total. 


The page flips open to reveal a place for journaling and a spot for another photo. 


I used another diecut and added some bling to the corners. Then cut out another sentiment and popped it up on pop dots. I created the butterfly in the corner out of lace. They are so easy and so much fun to make.   (They are also small enough to use on a card. )


For the last page I cut out 2 stamp frames using a sizzlet die I have had for years and never used. I then embellished with silver leaves that i punched out and added 3 recollection roses. 

Thank you for stopping by and I hope you all have a blessed week. 


Tuesday, May 22, 2012

B&W MINI ALBUM PAGE 5

Good afternoon.
I was finally able to work on page 5 of my mini album. 
Im really loving how this is turning out. Im sorry about the bad quality 
of the pictures but been having camera issues. 


 Front of Tag

 Inside of tag with smaller tags. 

 inside tag with smaller tags removed.